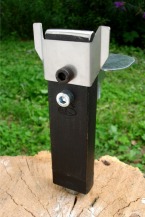
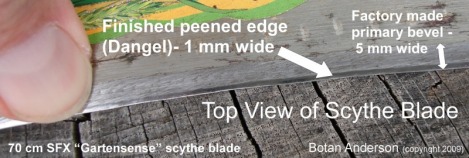
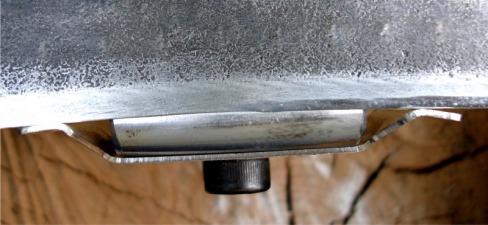
 This is a new style of a narrow scythe anvil, designed by Ernst Schoiswohl for the Schroeckenfux Scythe Factory. It is now available in a tall model. It features an adjustable support platform that can now be mounted at two different levels, a guide for the edge of the blade, plus a precisely and expertly shaped normal radius on the anvil face. The anvil is made from extremely high quality steel, hardened to 58-60 Rockwell. It is available in both a short (10cm) and a tall (16cm) styles. Both styles that I carry have a normal radius. 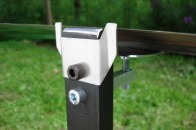 The attachable guide plate and support platform make it easy to keep the edge in the correct position on the anvil face. These anvils makes it much easier for a beginner to get good results when freehand peening. Experienced peeners may remove the guide and support platform, but they will still greatly appreciate the exceptional hardness of the anvil and the expertly shaped radius. Amazing consistency is possible with this anvil. The Support Platform vs. Blade Width 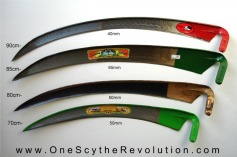 The SFX anvil was originally designed with a support platform for use with the very narrow scythe blades sold by the Austrian Scythe Association, similar to the red one at the top of the picture here. So the support platform was designed to mount on the top hole that the guide plate now attaches to. The platform cannot go down far enough for wider blades from this position, however. For example, when peening our 50mm wide blades, the platform wouldn't go down far enough to peen the wider beard area correctly. The edge can not lay flush across the surface of the radius of the anvil, if the platform is too high. You do not get good contact this way. Since I personally prefer to use wider scythe blades, and I find the support platform to be the most useful when peening wider blades, I asked the manufacturer to customize the SFX anvils for 1SR with a second hole beneath the first one, so that our customers would have the option of mounting the platform at a lower setting. Short vs. Tall Anvils 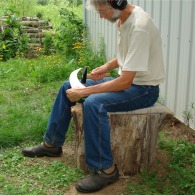 Scythe anvils are categorized as narrow or wide, and short or tall. Short anvils are used on stumps that are either separate from your seat, or on a peening horse. Tall anvils are used on stumps or stones, big enough for you and the anvil to sit on. The advantage of this, is that mass of the larger stump, plus your own weight, create an extremely solid and stable base for the anvil. The stump will not wiggle, and the anvil will have a solid base. This makes peening much nicer. It makes consistency and accuracy, easier to achieve. Fine-Tuning the Guide Plate 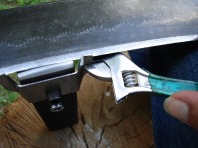 The wings of the guide plate must be adjusted for the type of blade that you have, so that the edge of the blade is aligned correctly across the top of the radius of the anvil surface. I find this to be the easiest to do with a small adjustable crescent wrench. Just close it on the wings, and then with the blade on the anvil, pry the wrench forward or backward, until the blade is in the correct position. When you order a scythe and a SFX peening kit from me, I assemble the anvil for you, and adjust the guide-plate for your scythe blade, but you may still need to fine-tune it. I prefer to use the support platform as a finger rest, especially near the tip of the blade, where its width changes so quickly. It is much easier to adjust your fingers, than it is to constantly have to stop and spin the platform down. When peening the long mid-section of longer scythe blades (75-90cm), I switch to letting the rib of the blade lay directly on the platform, adjusting the platform as I go. Then when I get to the beard area, I spin the platform down even further, and switch to supporting the blade with my fingers again, while my fingers rest on the platform. Some peeners would rather dispense with the platform, but I find that it makes peening much more comfortable for my left wrist, when peening wider blades. The Diagonal Drawing Hammer Strike My Hammering Technique - By hammering at a diagonal, the blade is moved incrementally to the right with each hammer strike. I take advantage of this by starting at the tip of the blade, and working my way back to the beard, instead of the traditional beard-to-tip direction. This enables the blade to slide smoothly across the anvil face (if your edge is clean!), making it easier to peen an even line. In hot sweaty weather, I prefer to wear a glove on my left hand, so my hand doesn't stick to the platform, nor my fingers to the blade. Notice how smooth and evenly a line can be peened on the SFX anvil, with the guide plate, and good hammering technique and form. In HD you can see how the metal is smoothly drawn out by each strike. I prefer to gently draw out the edge with successive passes. Striking with more force will move more of the metal out quicker, but stretching the metal too dramatically can lead to tiny tears, or cracks. From the angle of this video, it's difficult to see how much metal is being moved. From my side of the blade however, it was quite noticeable (see photo below). About 0.5mm. In this close-up photo, you can see result of my progress from the above videos, on the first pass with Diagonal Drawing Hammer Strike. Notice how much metal is being moved, and how even it is. Consistent hammering, plus having both wings of the guide-plate properly adjusted, makes it easy to draw out the metal this evenly. Notice how I have the right wing adjusted more forward, to accommodate the amount of metal being drawn forward. The Packing Hammer Strike After several passes with the "Diagonal Strike" I finish the blade with one or two passes with the Packing Hammer strike. To learn more about my peening method, read my 1SR Peening Manual. Update 12-2-14: I just edited the videos from above, that I shot back in 2010, into a more complete instructional video. See below. My intention when filming it back in 2010, was to make an instructional video like this for the SFX anvil, but then this modified version, became unavailable. While the new SFX anvils are still good anvils, I don't like that they all seem to have a rather wide radius (my sample does anyway), the support bracket doesn't go down far enough to use as a finger rest. I also find that I need to make many fine-tuned adjustments to the guide plate, as I am peening more curved blades, which is not that quick and easy to do. While I have 4 SFX anvils of my own, I actually prefer to peen now with a Picard anvil and my 1SR Roll-Guide. I am very happy with the consistency that I can get with the new profile on the Picard anvil, in conjunction with the roll-guide. See http://onescytherevolution.com/peening-supplies.html The roll-guide is quick and easy to adjust, with just a couple of taps, and the accuracy and consistency that I can get, is even better than with the SFX anvil. So for those of you who already have an SFX or FUX anvil, here is an instructional video for a sense of how to peen with it: BOTAN ANDERSON Copyright 2010, Copyright 2014
7 Comments
claude
7/28/2012 03:06:33 am
google translate :
Reply
Nick
5/22/2013 09:29:19 am
I think he was asking how much to buy the manual by itself, without the peening kit. Just a SWAG. 2/26/2015 03:46:38 am
My peening manual is available at https://www.scribd.com/doc/257046848/1SR-Scythe-Peening-Manual
Reply
Thanks for the detailed instructions and updated video. I picked up a scythe last year to clear some steep hills at our place, after the machete and rakes weren't getting it done. It needed sharpening and I just got my SFX anvil and stones in. I'll be trying them out on Friday and feel a lot more confident in trying it out after watching your video.
Reply
Rain Otari
3/22/2020 06:57:38 am
Can you use the sfx peening anvil to repair a crack in the scythe? Or do you need a different wide anvil.
Reply
5/19/2020 09:22:20 am
I can not for the life of me find the FUX anvil with the guide for purchase. Where can I get one?
Reply
Your comment will be posted after it is approved.
Leave a Reply. |
Botan AndersonArchives
March 2023
Categories
All
|

 RSS Feed